
PG 280 - Floor grinder HUSQVARNA - Free user manual and instructions
Find the device manual for free PG 280 HUSQVARNA in PDF.

| Brand | Husqvarna |
| Model | PG 280 |
| Product type | Floor grinder |
| Surfacing width | 280 mm |
| Weight | 70 kg |
| Motor power (three-phase) | 3 kW / 4 hp |
| Motor power (single-phase) | 2.2 kW / 3 hp |
| Rated voltage (three-phase) | 400 V |
| Rated voltage (single-phase) | 230 V |
| Rated current (three-phase/single-phase) | 16 A / 12.9 A |
| Rotation speed | 2800 rpm (three-phase) or 1400 rpm (single-phase) |
| Surfacing pressure | 35 kg |
| Power supply | Electric with grounding plug |
| Main functions | Grinding and leveling of concrete floors, removal of adhesive, putty, paint residues |
| Dust extraction system | Connection for vacuum cleaner (50 mm nozzle), rubber skirt |
| Safety equipment | Emergency stop, locking button, motor protection |
| Maintenance and cleaning | Regular cleaning of cooling vents, check of rubber plates and dust guard |
| Spare parts and repairability | Use only genuine Husqvarna parts, repairs by authorized workshop |
| Sound level (acoustic power) | 107 dB(A) measured, 108 dB(A) guaranteed |
| Vibration level (handle) | 3.4 m/s² |
| Compliance | EC directives 2006/42/EC, 2004/108/EC, 2006/95/EC |
Frequently Asked Questions - PG 280 HUSQVARNA
User questions about PG 280 HUSQVARNA
0 question about this device. Answer the ones you know or ask your own.
Ask a new question about this device
Download the instructions for your Floor grinder in PDF format for free! Find your manual PG 280 - HUSQVARNA and take your electronic device back in hand. On this page are published all the documents necessary for the use of your device. PG 280 by HUSQVARNA.
USER MANUAL PG 280 HUSQVARNA
natural_image
Icon of an open book inside a circle (no text or symbols)
Operator's manual
Please read the operator's manual carefully and make sure you understand the instructions before using the machine.

natural_image
Line drawing of a cleaning or cleaning machine with wheels and handle, enclosed in a circle (no text or symbols)GB ES DE FR
Symbols on the machine:
WARNING! The machine can be a dangerous tool if used incorrectly or carelessly, which can cause serious or fatal injury to the operator or others.
Please read the operator's manual carefully and make sure you understand the instructions before using the machine.
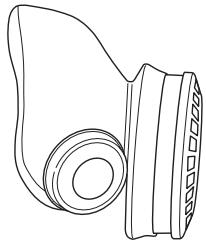
Wear personal protective equipment. See instructions under the heading "Personal protective equipment".
WARNING! Dust forms when grinding, which can cause injuries if inhaled. Use an approved breathing mask. Always provide for good ventilation.
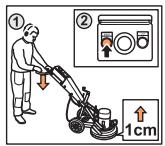
Starting: Reduce the pressure between grinding disc and floor by pushing down on the handle without raising the grinding unit off the ground.
This product is in accordance with applicable EC directives.
Environmental marking. Symbols on the product or its packaging indicate that this product cannot be handled as domestic waste.
By ensuring that this product is taken care of correctly, you can help to counteract the potential negative impact on the environment and people that can otherwise result through the incorrect waste management of this product.
For more detailed information about recycling this product, contact your municipality, your domestic waste service or the shop from where you purchased the product.
Other symbols/decals on the machine refer to special certification requirements for certain markets.


Symbols in the operator's manual:
Inspection and/or maintenance should be carried out with the motor switched off and the plug disconnected.
Always wear approved protective gloves.
Regular cleaning is required.
Visual check.
Protective goggles or a visor must be worn.


CONTENTS
Contents
KEY TO SYMBOLS
Symbols on the machine: 2
Symbols in the operator's manual: 2
CONTENTS
Contents 3
WHAT IS WHAT?
What is what on the grinder? 4
SAFETY INSTRUCTIONS
Before using a new grinder 5
Personal protective equipment 5
General safety precautions 6
ASSEMBLY
Fit the handle 8
Changing the diamonds 8
Connect the vacuum cleaner 9
Transport 9
GRINDING GUIDE
Diamonds 10
Determining the hardness of concrete 10
Diamond selection 11
The motor's direction of rotation 13
STARTING AND STOPPING
Before starting 14
Starting 14
Stopping 14
MAINTENANCE
Faults and trouble shooting 15
Maintenance 15
Service 15
TECHNICAL DATA
Technical data 16
EC-declaration of conformity 16
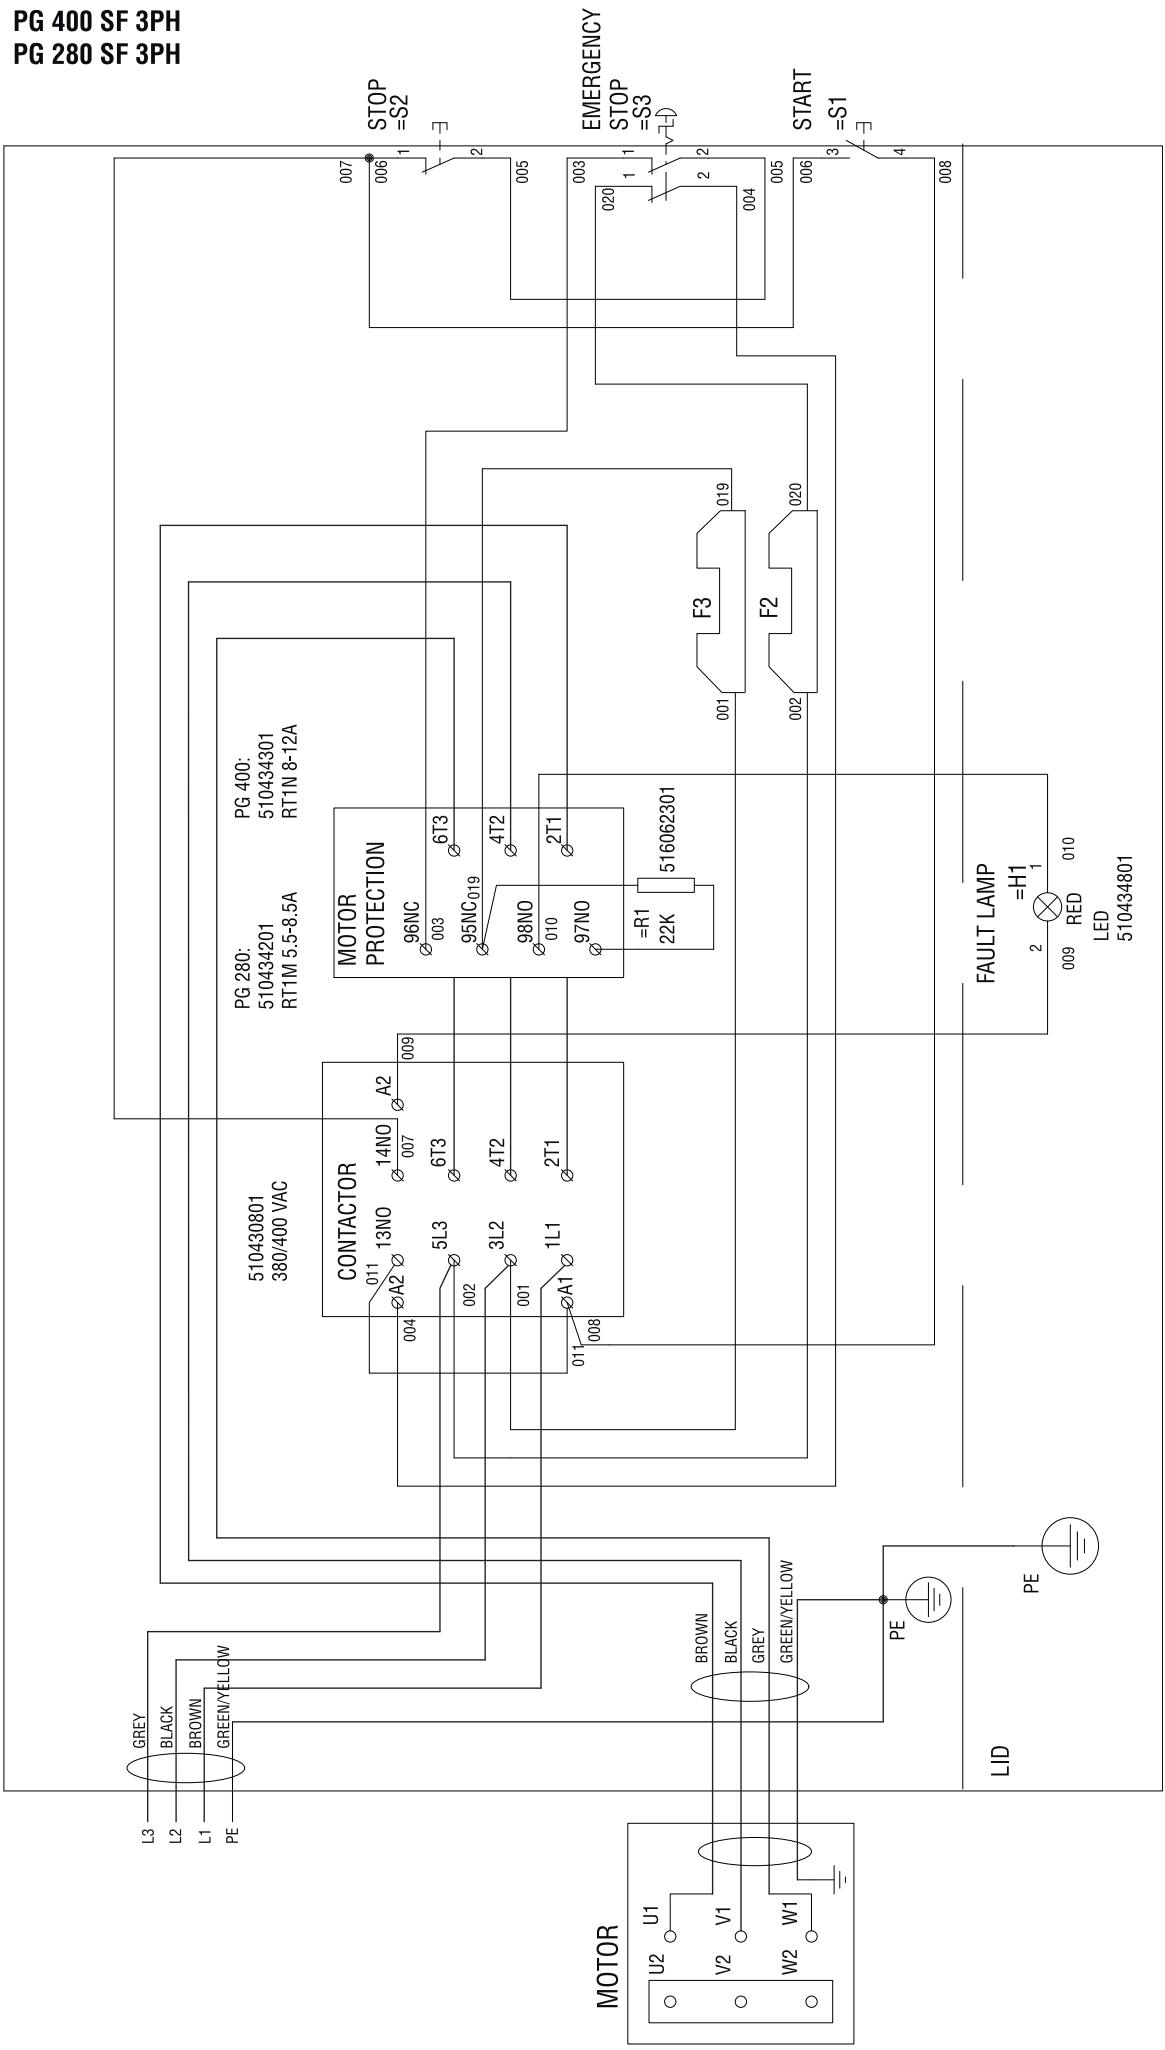
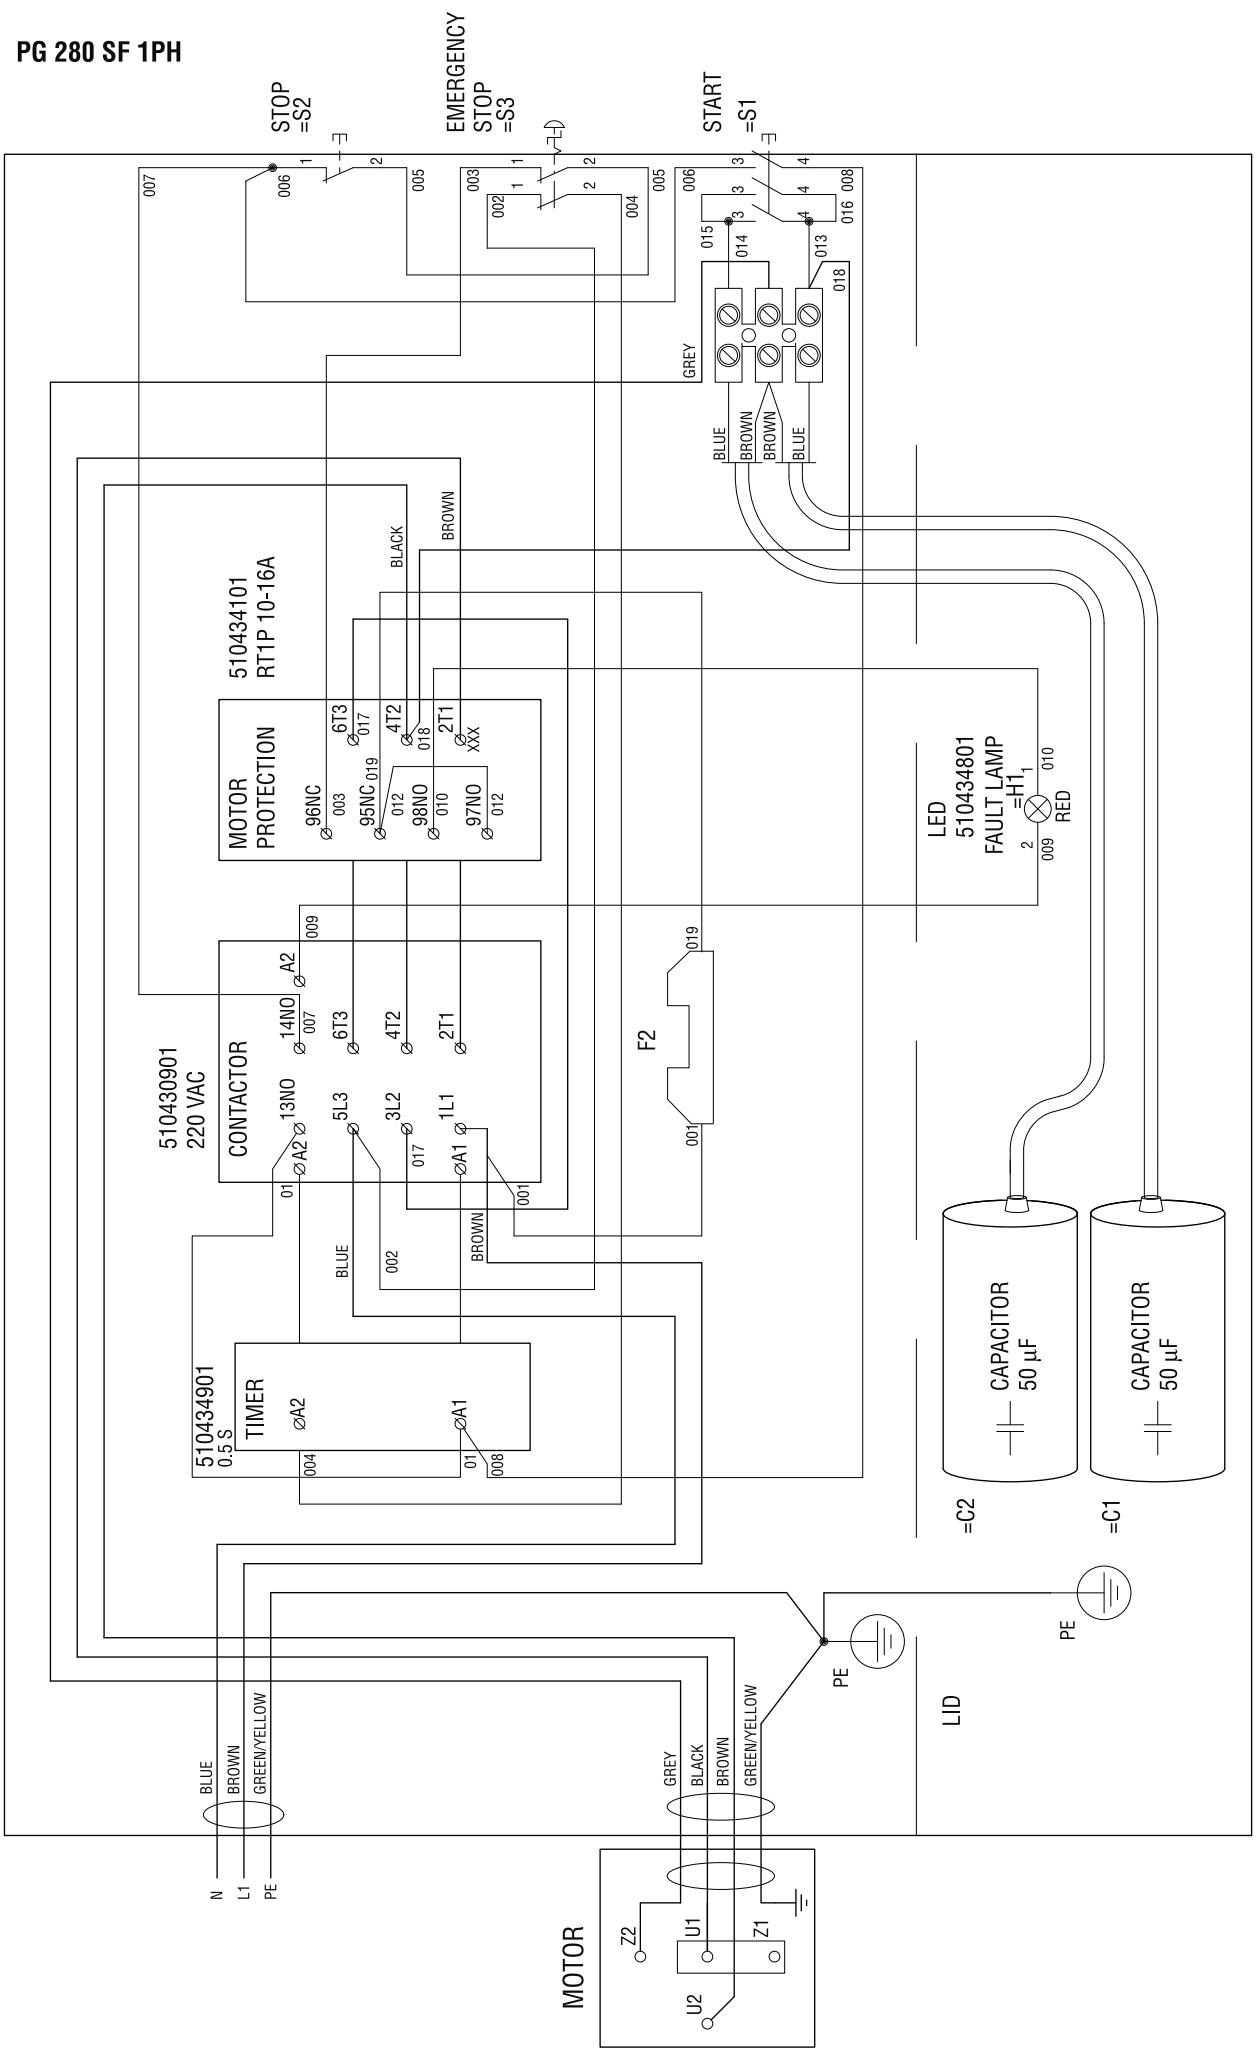
WIRING DIAGRAM

text_image
Technical diagram of a lawn mower with numbered components and labeled parts, including a Husqvarna device.What is what on the grinder?
1 Electric box
2 Cover
3 Crank for adjusting grinding pressure
4 Lifting eye
5 Electric motor
6 Lifting handle
7 Skirt
8 Connection for vacuum cleaner
9 Wheel set
10 Cover locking knob
11 Screws, cover
12 Grinding unit - PG 280 SF
13 Grinding unit - PG 400 SF
14 Handle / handlebar
15 Control Panel
16 Start button
17 Emergency stop
18 Stop button
19 Locking knob for handlebar adjustment
20 Operator's manual
Before using a new grinder
- Please read the operator's manual carefully and make sure you understand the instructions before using the machine.
- Grinders PG 400 SF and PG 280 SF are designed for surface removal of glue/adhesive residues, putty and the like from concrete floors and grinding and flattening out concrete floors. SF stands for single disc, fixed speed.
- The machine can cause serious personal injury. Read the safety instructions carefully. Learn how to use the machine.
- Only staff that have received the necessary education, both practically and theoretically concerning their usage should operate the machinery.
Always use common sense
It is not possible to cover every conceivable situation you can face. Always exercise care and use your common sense. Avoid all situations which you consider to be beyond your capability. If you still feel uncertain about operating procedures after reading these instructions, you should consult an expert before continuing.
Do not hesitate to contact your dealer if you have any more questions about the use of the machine. We will willingly be of service and provide you with advice as well as help you to use your machine both efficiently and safely.
Let your Husqvarna dealer regularly check the machine and make essential adjustments and repairs.
All information and all data in the Operator's Manual were applicable at the time the Operator's Manual was sent to print.

WARNING! Under no circumstances should you modify the original design of the machine without approval from the manufacturer. Always use original spare parts. Unauthorized modifications and/or accessories may lead to serious injury or death to the user or others.

WARNING! Use of products which cut, grind, drill, sand or shape material can generate dust and vapors which may contain harmful chemicals. Know the nature of the material being worked on and wear appropriate dust mask or respirator protection.
Personal protective equipment

WARNING! You must use approved personal protective equipment whenever you use the machine. Personal protective equipment cannot eliminate the risk of injury but it will reduce the degree of injury if an accident does happen. Ask your dealer for help in choosing the right equipment.
- Protective helmet
- Hearing protection
• Protective goggles or a visor
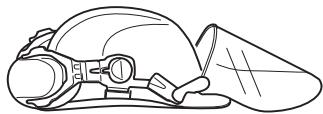
- Breathing mask
natural_image
Line drawing of a mechanical component with no visible text or symbols• Heavy-duty, firm grip gloves.
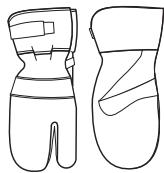
- Tight-fitting, heavy-duty and comfortable clothing that permits full freedom of movement.

natural_image
Line drawing of a pair of trousers with a belt buckle (no text or symbols)• Boots with steel toe-caps and non-slip sole.

• Always have a first aid kit nearby.

General safety precautions

WARNING! This section describes basic safety directions for using the machine. This information is never a substitute for professional skills and experience. If you get into a situation where you feel unsafe, stop and seek expert advice. Contact your dealer, service agent or an experienced user. Do not attempt any task that you feel unsure of!
- Do not use the machine without first reading and understanding the contents of this Operator's Manual.
Work area safety
- Do not use the machine in bad weather, such as dense fog, rain, strong wind, intense cold, etc.
- Keep work area clean and well lit. Cluttered or dark areas invite accidents.
- The machine should not be used in areas where potential for fire or explosions exist.
Electrical safety

WARNING! There is always a risk of shocks from electrically powered machines. Avoid unfavourable weather conditions and body contact with lightning conductors and metal objects. Always follow the instructions in the Operator's manual to avoid damage.
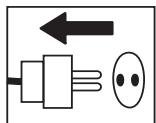
- Never drag the machine by means of the cord and never pull out the plug by pulling the cord.
- Keep all cables away of water, oil and sharp edges. Make sure the cable is not pinched in doors, fences or the like. It can cause the object to become live.
- Check that the cables are intact and in good condition. Use cable intended for outdoor use.
- Never use the machine if any cable is damaged, but hand it in to an authorized service workshop for repair.
- The machine should be connected to an earthed outlet socket.
- Check that the mains voltage corresponds with that stated on the rating plate on the machine.
- Be on your guard for electrical shocks. Avoid having body contact with lightning-conductors/metal in the ground.
- Do not use an extension cord while it is rolled up to avoid overheating.
- Ensure the cord is behind you when you start to use the machine so that the cord will not be damaged.
Personal safety

WARNING! Overexposure to vibration can lead to circulatory damage or nerve damage in people who have impaired circulation. Contact your doctor if you experience symptoms of overexposure to vibration. Such symptoms include numbness, loss of feeling, tingling, pricking, pain, loss of strength, changes in skin colour or condition. These symptoms normally appear in the fingers, hands or wrists. These symptoms may be increased in cold temperatures.
- Wear personal protective equipment. See instructions under the heading "Personal protective equipment".
- Never use the machine if you are tired, if you have drunk alcohol, or if you are taking medication that could affect your vision, your judgement or your co-ordination.
- Never allow anyone else to use the machine without first ensuring that they have understood the contents of the operator's manual.
- All operators shall be trained in the use of the machine. The owner is responsible for ensuring that the operators receive training.
- People and animals can distract you causing you to lose control of the machine. For this reason, always remain concentrated and focused on the task.
- Be careful as clothing, long hair, and jewellery can get caught in moving parts.
- Never leave the machine unsupervised with the motor running.
- Make sure that there is always another person close at hand when you use the machines, so that you can call for help if an accident should occur.
- Always ensure you have a safe and stable working position.
Use and care
- Only use the machine for the purpose it was intended for.
- Keep all parts in good working order and ensure that all fixtures are properly tightened.
- Never use a machine that is faulty. Carry out the checks, maintenance and service instructions described in this manual. Some maintenance and service measures must be carried out by trained and qualified specialists. See instructions under the heading Maintenance.
- Do not modify safety equipment. Check regularly that they function as they should. The machine must not be run with defective or disassembled safety equipment.
- Never use a machine that has been modified in any way from its original specification.
- Machinery should only be started when grinding heads are resting on the ground unless carrying out a testing procedure as outlined in this manual.
- The machine should not be started without the rubber dust skirt attached. It is essential a good seal between machine and floor be established for safety, especially when operating in dry grinding applications.
- During grinding, the machine must be connected to a vacuum cleaner to sucking off the dust.
- When changing the grinding discs ensure power supply to the unit is OFF by engaging the Emergency Stop button and the power-plug disconnected.
- After each grinding/polishing operation always remove the diamond tools.
- Make sure that the rubber skirt is intact and clean and that it seals tightly against the floor. Damaged rubber skirt should always be replaced.
- When removing glue, asphalt, paint etc. always raise the machine from the surface after use to prevent it from sticking to the floor due to the heat. Make sure the grinding head has stopped rotating before raising the machine.
- Diamond tools may be very hot after use. Leave machine to cool off before removing the diamond segments. Use protective gloves.
• Always use the machine mounted lifting eye when lifting. - Always carry the machine by the carrying handle and the handle.
Transport and storage
- The machine should always be transported under cover limiting the exposed to natural elements – in particular rain and snow.
- Store the equipment in a lockable area so that it is out of reach of children and unauthorized persons.
- The machine should always be stored in a dry place when not in use.
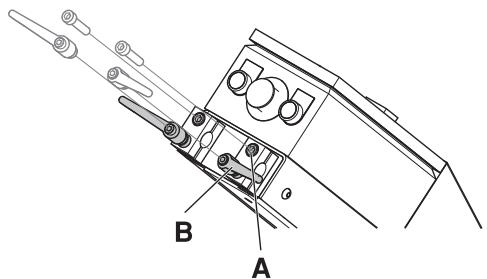
Fit the handle
- Remove the screws (A).
text_image
A B- Remove the locking knobs (B).
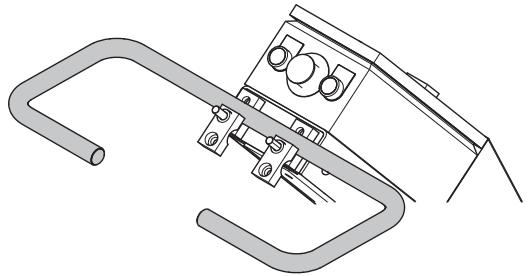
• Fit the handle in the handle stand-off on the machine.
natural_image
Technical line drawing of a mechanical clamp or bracket assembly (no text or symbols)• Refit screws (A) and locking knobs (B).
- The locking knobs should be positioned in-line with the handlebar to reduce the risk of damaging the knobs when laying down the machinge when changing tools.
natural_image
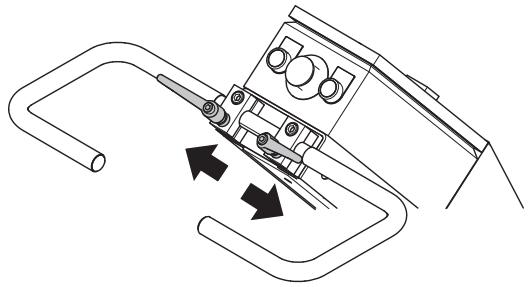
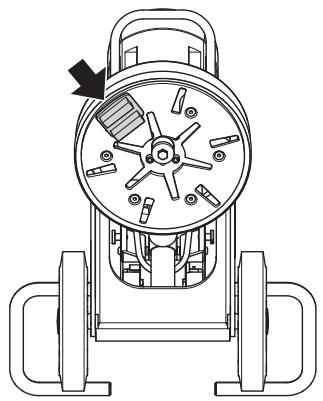
Technical line drawing of a mechanical component with arrows indicating motion or force direction (no text or symbols)Changing the diamonds
Shut down the machine and disconnect the power plug.
Have a set of gloves ready, as diamond tools can get very hot.
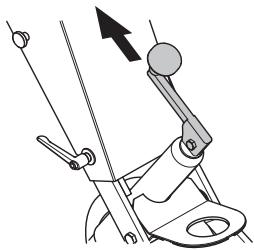
- Crank up the handlebar to the highest position.
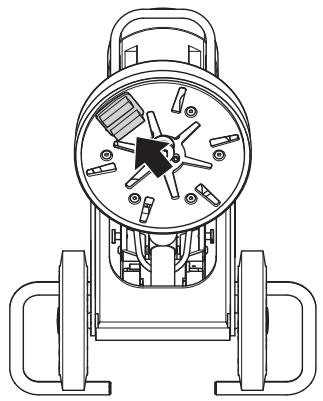
natural_image
Technical line drawing of a mechanical device with lever and base mount (no text or symbols)- Pull back on handle to lift grinding head off the ground.
- Lay machine back on the ground.
natural_image
Line drawing of a mechanical device with wheels and a cylindrical component (no text or symbols)- Put on gloves.
- Use a hammer to remove the diamond segments.
natural_image
Technical line drawing of a mechanical device with no visible text or symbols• Affix new diamond segments on the grinding disc.
natural_image
Technical line drawing of a mechanical device with internal components and mounting brackets (no text or symbols)- Once new diamond segments have been attached, reverse procedure to lower machine to ground.
Connect the vacuum cleaner
Connect the vacuum cleaner to the machine. Use a 50 mm (2 inch) hose.
natural_image
Pure mechanical diagram showing a lever and base assembly without any text, numbers, or symbols- It is highly recommended to use the Husqvarna DC 3300 dust extraction system for complete dust control.
- Make sure that the filters in the vacuum cleaner are intact and clean. Pay attention to dust during operation.
- Adjust the rubber skirt to be in contact with the floor to ensure efficient dust collection.
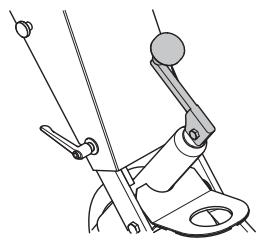
Transport
The machine can be folded to minimize space needed for transport.
- Loosen the screws and the lock handle that hold the cover in place.
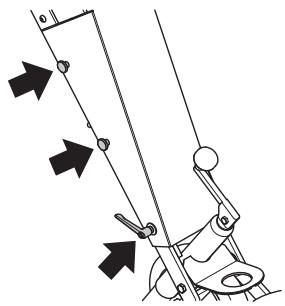
natural_image
Diagram of a mechanical device with directional arrows indicating motion or force (no text or symbols)- Remove the cover.
- Place the crank with the handle pointing straight upwards.
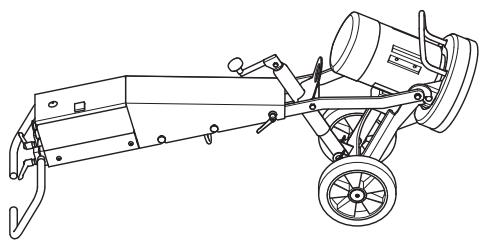
natural_image
Diagram of a mechanical device with lever and guide mechanism (no text or symbols)- Carefully fold the machine forward. Put padding between the motor and the electric box to prevent damage to the machine.
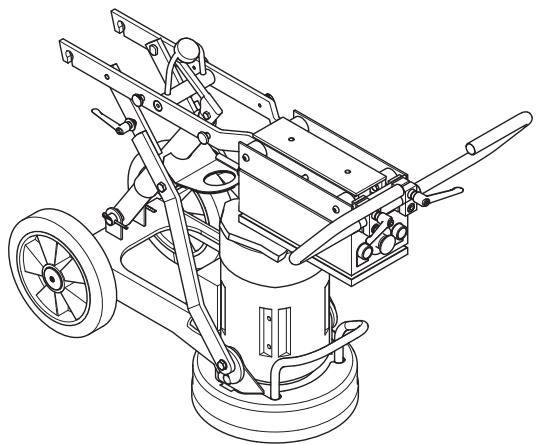
natural_image
Technical line drawing of a mechanical cleaning or maintenance device with wheels and levers (no text or symbols)- The cover can be attached to the side of the machine.
Diamonds
Background
Diamond abrasives usually consist of 2 components:
- Diamond powder (also known as diamond crystals or grit). By changing the size of the diamond powder or grit, we can change how coarse or fine the scratches will be that are left behind from the grinding process.
- A binding agent (metal or resin). Diamond powder is mixed and suspended in either a metal or resin binding agent. When suspended in a metal binding agent, the finished product is referred to as a Metal Bond or Sintered diamond segment. When suspended in a resin binding agent, the finished product is referred to as a Resin Bond diamond segment or pad. By changing the hardness of the binding agent, we can change how fast or slow the diamond abrasive will wear.
General Principles
The following are general rules regarding diamond segments in grinding applications. As with all general rules there are exceptions or cases when it is not the case.
Diamond grit size
Changing the size of the diamond grit to a smaller particle/grit size will effect the performance of the diamond tool in the following ways:
• Create a finer scratch pattern.
- Increase life of diamond tool.
The opposite will occur when changing to a larger particle/grit size.
Binding agent
Increasing hardness of bond will:
• Create a finer scratch pattern.
- Increase life of diamond tool.
• Decrease production rate.
The opposite will occur when making the metal or resin bond softer.
Number of diamond segments/pads under the machine
Increasing the number of segments under the machine will:
- Reduce pressure on each individual diamond segment - reduce wear rate on diamond segments.
- Reduce load on the machine and cause the grinder to draw less current.
- Create a smoother scratch pattern (particularly on soft floors).
The opposite will occur when decreasing the number of segments under the machine.
Summary of diamond principles
Diamond segments need to wear in order to achieve productivity. Diamond segment wear can be influenced by the following factors:
- Pressure.
- Hardness of bond.
- Diamond grit size.
• Number of segments under the machine. - Adding an additional abrasive (e.g. sand, silicone carbide) on the floor will increase wear.
Generally, the faster a diamond segment wears, the faster the productivity will be. By varying the above factors, changes can also be made to effect the following:
- Scratch pattern.
• Current draw of machine. - Flatness of floor (see next section).
- Ease of operation.
Determining the hardness of concrete
All concretes are measured by their compressive strength and depending on which part of the world you are from, different compressive strength indices (e.g. PSi & MPa) are used. Generally, the higher the compressive strength rating, the harder the concrete and therefore, the harder it will be to grind.
However, other factors beside compressive strength ratings determine how hard the floor will be, and therefore, the correct diamond selection. Since grinding normally only deals with the surface of the concrete (top 5mm or 1/4 inch), often the way the concrete floor has been finished or the condition of the surface will have a greater bearing on what type of diamond to select, rather than the compressive strength rating of the concrete.
Surface factors to consider when making a diamond selection
Generally, if a concrete surface is very smooth (i.e. Most likely it has been heavily trowelled/helicoptered), the concrete will behave as if it has a high compressive strength and therefore, require a soft bond segment.
Accordingly, if a concrete surface is coarse/aggressive (e.g. rain-damaged, shot blasted, scarified, exposed aggregate e.t.c.), the concrete will behave as if it has a low compressive strength and therefore, require a hard bond segment.
Surface coatings/contaminants (e.g. Epoxy coatings, ceramic tile adhesives, levelling compounds/screeds) will often have a larger bearing on what diamond to select, than will the compressive strength of the concrete.
As a general rule, when grinding a concrete slab for the first time and you are unsure about its hardness, always begin with harder bond diamonds under the machine. This will ensure the least amount of wear on the diamond segments. If a hard diamond segment is not suited to the application, all it has cost is a little amount of time without wearing out the diamonds.
If performed the other way around (i.e. a soft segment is used to begin with) and the concrete is soft or possesses an abrasive surface or surface contaminant, it is quite possible to wear-out a considerable amount of diamond in very short period of time.
Diamond selection
They way diamond segments are set-up on the grinding unit will greatly influence the performance of the machine, the productivity levels and also the finished floor quality.
There are a number of different diamond configurations that can be achieved on both the PG 400 SF and PG 280 SF.
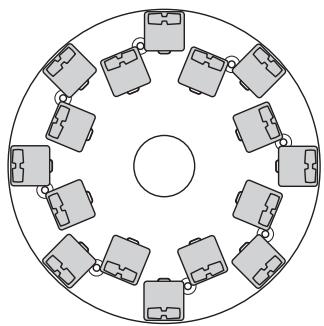
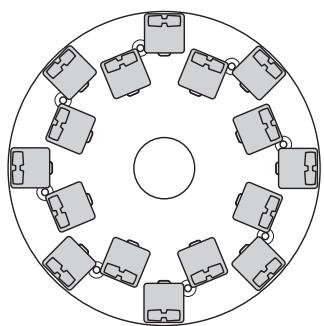
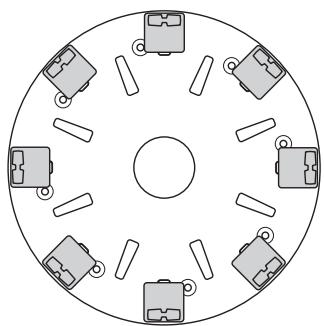
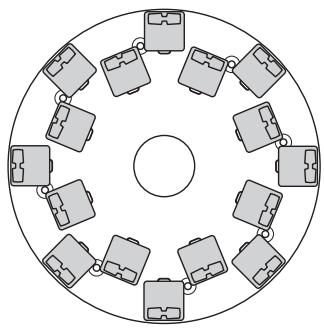
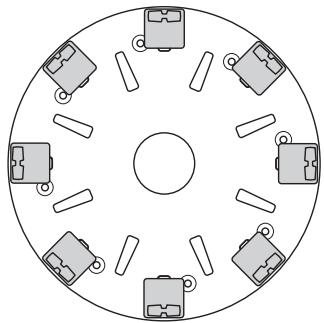
Metal bond diamonds
Full set - inner and outer row
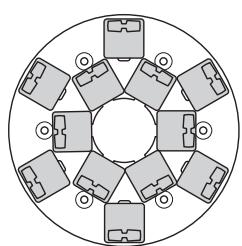
natural_image
Circular diagram with eight identical mechanical components arranged symmetrically around a central circle (no text or symbols)PG 280

natural_image
Circular diagram with 12 identical briefcase icons arranged in a ring around a central circle (no text or labels)PG 400
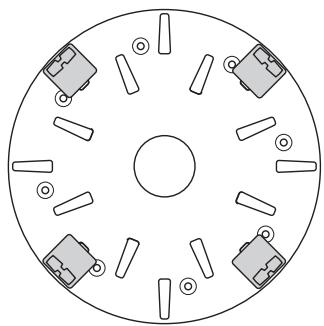
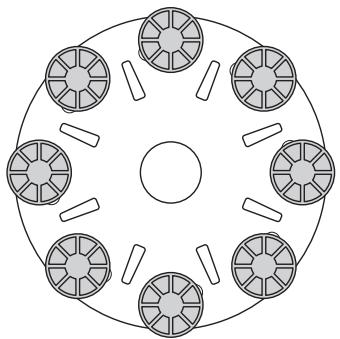
Full set - outer row
natural_image
Circular diagram with eight identical camera icons arranged radially around a central point (no text or labels)PG 280

natural_image
Circular diagram with eight small mechanical components arranged symmetrically around a central circle (no text or labels)PG 400
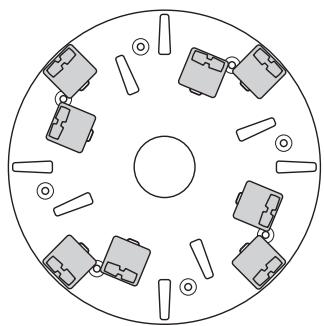
Half set - inner and outer row
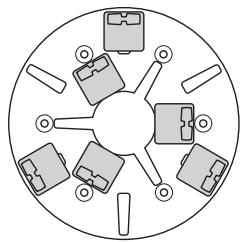
natural_image
Circular diagram with eight gray icons arranged radially around a central circle (no text or symbols)PG 280

natural_image
Circular diagram with eight mechanical components arranged symmetrically around a central circle (no text or labels)PG 400
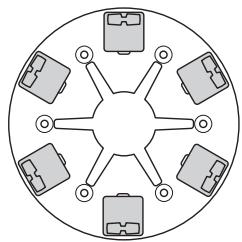
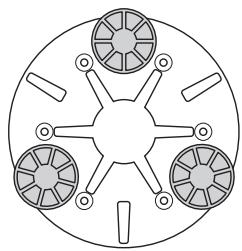
Half set - outer row
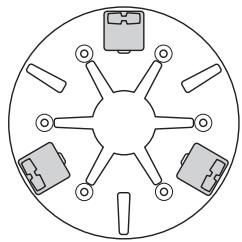
natural_image
Circular diagram with six labeled components radiating from a central point (no text or symbols)PG 280

natural_image
Circular diagram with six small mechanical components arranged symmetrically around a central circle (no text or symbols)PG 400
Select the correct metal bond diamonds for your application
The following suggestion cover the basic configurations for metal bonded diamond tools.
| Applications | Metal bond | Grit size | Full set - inner and outer row | Full set - outer row | Half set - inner and outer row | Half set - outer row |
| Flatten floor - Hard concrete | Soft | 16 or 30 | X | |||
| Flatten floor - Medium concrete | Medium | 16 or 30 | X | |||
| Flatten floor - Soft concrete | Hard | 16 or 30 | X | |||
| Ceramic tile adhesive removal | Medium | PIRANHATM or 16-30 | X | |||
| Vinyl or Carpet glue removal - Hard concrete | Soft | PIRANHATM or 16-30 | X | X | ||
| Vinyl or Carpet glue removal - Medium concrete | Medium | PIRANHATM or 16-30 | X | X | ||
| Vinyl or Carpet glue removal - Soft concrete | Hard | PIRANHATM or 16-30 | X | X | ||
| Epoxy paint removal - Hard concrete | Soft | PIRANHATM or 16-30 | X | X | ||
| Epoxy paint removal - Medium concrete | Medium | PIRANHATM or 16-30 | X | |||
| Epoxy paint removal - Soft concrete | Hard | PIRANHATM or 16-30 | X | |||
| Rain damaged concrete | Hard | 16-30 | X | X | ||
| Smoothen exposed aggregate | Hard | 16-30 | X | X | ||
| Lippage removal in terrazzo/stone tiles | Soft | 30 or 60 | X | |||
| Surface polishing of concrete floors - Hard concrete | Soft | 60 | X | X | ||
| Surface polishing of concrete floors - Medium concrete | Medium | 60 | X | X | ||
| Surface polishing of concrete floors - Soft concrete | Hard | 60 | X | X | ||
| Grinding to exposed aggregate in concrete - Hard concrete | Soft | 16-30 | X | X | X | |
| Grinding to exposed aggregate in concrete - Medium concrete | Medium | 16-30 | X | X | X | |
| Grinding to exposed aggregate in concrete - Soft concrete | Hard | 16-30 | X | X | ||
| Flatten undulation in concrete floors - Hard concrete | Soft | 16 or 30 | X | X | X | |
| Flatten undulation in concrete floors - Medium concrete | Medium | 16 or 30 | X | X | ||
| Flatten undulation in concrete floors - Soft concrete | Hard | 16 or 30 | X | X |
Resin bond diamonds
Redi Lock resin attachment adaptor
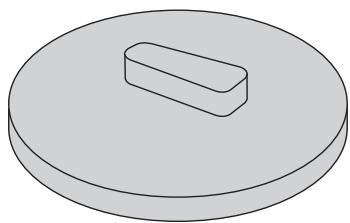
natural_image
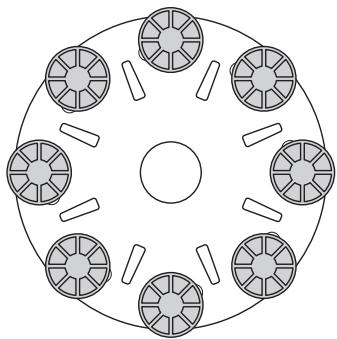
Simple 3D diagram of a rectangular block on a circular base (no text or symbols)Full set - outer row

natural_image
Circular diagram with six petal-like segments radiating from a central point, no text or symbols present.PG 280
natural_image
Circular diagram with eight segmented circular components arranged symmetrically around a central circle (no text or symbols)PG 400
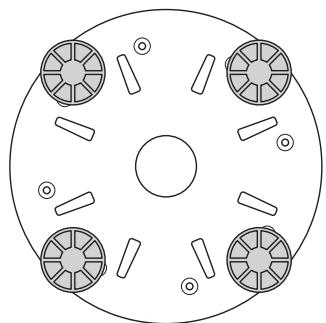
Half set - outer row
natural_image
Circular diagram with four segmented circular elements and radial lines, no text or symbols presentPG 280

natural_image
Circular diagram with four circular components and a central circle, no text or symbols presentPG 400
Selecting the correct resin bond diamond configuration for your application
| Applications | Full set - outer row | Half set - outer row |
| Polishing terrazzo/stone tiles | X | |
| Resurfacing terrazzo/stone tiles | X | |
| Surface polishing of concrete floors - Hard concrete | X | |
| Surface polishing of concrete floors - Medium concrete | X | |
| Surface polishing of concrete floors - Soft concrete | X |
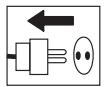
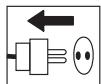
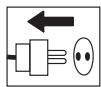
The motor's direction of rotation (3 phase)
The motor's direction can be changed by reversing the poles in the power plug.
NOTE! The Piranha/PCD tools are designed to run in only one direction.
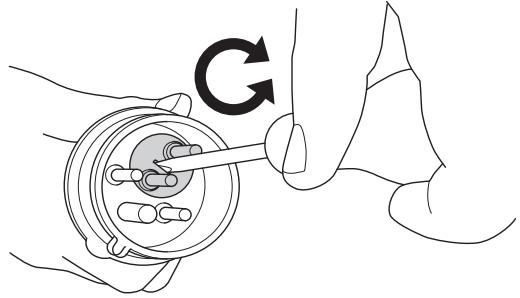
natural_image
Illustration of a hand holding a mechanical component with a circular base and a tool, no text or symbols presentSTARTING AND STOPPING
Before starting

• Position grinder on the working area.
- Make sure there are diamonds beneath the machine and that they are firmly attached.
- Connect the vacuum cleaner to the machine.
- Use locking knobs for handlebar adjustment to set most comfortable working height.
- Plug power supply to machine.
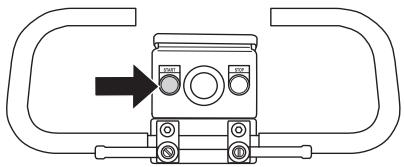
- Check that the emergency stop button is not pressed by turning it clockwise.
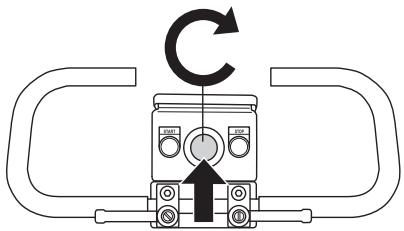
text_image
C A- Check the motor's direction of rotation
Starting

- Reduce the pressure between grinding disc and floor by pushing down on the handle without raising the grinding unit off the ground.
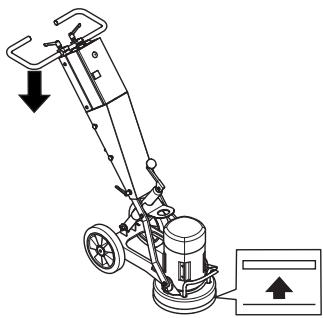
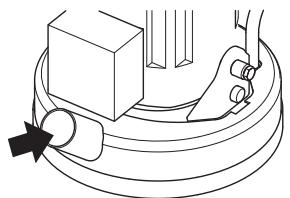
natural_image
Diagram of a mechanical tool with directional arrows indicating movement or force (no text or symbols present)- Press the start button and keep it pressed a few seconds to start the machine.
natural_image
Pure mechanical component diagram without any text, numbers, or symbolsStopping

- Use the stop button to shut down the machine.

natural_image
Pure mechanical component diagram without any text, numbers, or symbols- Keep grinding segments in contact with the floor when stopping. This will help bring the machine to a complete stop quickly. Do not lift the grinding head off the floor when stopping as this can create a significant amount of dust in the air.
Faults and trouble shooting
The machine will not run
- Check the power supply and the power cables and make sure that they are not damaged.
- Check that the emergency stop button is not pressed by turning it clockwise.
Machine is hard to hold onto
- Not enough diamonds under the machine (if grinding thick glue or soft floors, too few diamonds under the machine will greatly increase the load on grinder and operator). Usually also accompanied by high current draw by motor.
Increase number of diamonds under machine to reduce load on grinder and operator.
Machine is jumping around
- Rubber shock absorber pads in grinding unit may be worn out or damaged. Check and change if necessary.
- Diamonds may not be fitted correctly or have different heights. Check to ensure all diamonds are fitted correctly and are the same height.
The machine stops after just a while
- The machine is overloaded and the overload protection has been released. Reduce load. The machine will reboot after about a minute when the motor has cooled off.
The machine stops during start-up
- The electric motor has been overloaded or a phase is missing. Allow the machine one or two minutes to reset and try again. When this does not help, contact an authorised service workshop.
Maintenance
IMPORTANT! Inspection and/or maintenance should be carried out with the motor switched off and the plug disconnected.
Used correctly, the machine is an extremely low-maintenance and reliable product.
Cleaning
Always pull out the plug from the outlet socket before cleaning, maintenance or assembly.
Always clean all the equipment at the end of the working day. Do not use a high pressure washer to clean the machine.
In order for the machine to always be cooled sufficiently the cooling air openings must be kept clear and clean.
Rubber shock absorber pads
Check the rubber shock absorbing pads every month. Replace if necessary.
Electrical Feed

WARNING! Never use damaged cables. They can cause serious, even fatal, personal injuries.
Check that the cord and extension cord are intact and in good condition.
Never use the machine if the cord is damaged, hand it in to an authorized service workshop for repair.
Skirt
Make sure that the rubber skirt is intact and clean and that it seals tightly against the floor. Damaged rubber skirt should always be replaced.
Service
IMPORTANT! All types of repairs may only be carried out by authorised repairmen. This is so that the operators are not exposed to great risks.
Technical data
| PG 400 SF | PG 280 SF | PG 280 SF (Single-phase) | |
| Motor Power, kW/hp | 4/5,4 | 3/4 | 2,2/3,0 |
| Rated current, A | 16 | 16 | 12,9 |
| Rated voltage, V | 400 | 400 | 230 |
| Weight, kg/lbs | 115/254 | 70/154 | 70/154 |
| Grinding width, mm/inch | 400/16 | 280/11 | 280/11 |
| Grinding pressure, kg/lbs | 65/143 | 35/77 | 35/77 |
| Speed, rpm | 1400 | 2800 | 1400 |
| Noise emissions (see note 1) | |||
| Sound power level, measured dB(A) | 107 | 107 | 107 |
| Sound power level, guaranteed LWA dB(A) | 108 | 108 | 108 |
| Sound levels (see note 2) | |||
| Sound pressure level at the operators ear, dB(A) | 89 | 89 | 89 |
| Vibration levels (see note 3) | |||
| Handle right, m/s2 | 3,4 | 3,4 | 3,4 |
| Handle left, m/s2 | 3,4 | 3,4 | 3,4 |
Note 1: Noise emissions in the environment measured as sound power ( L_WA ) in conformity with EN 61029-1.
Note 2: Noise pressure level according to EN 61029-1. Reported data for noise pressure level has a typical statistical dispersion (standard deviation) of 1.0 dB(A).
Note 3: Vibration level according to EN 61029-1. Reported data for vibration level has a typical statistical dispersion (standard deviation) of 1 m/s^2 .
EC-declaration of conformity
(Applies to Europe only)
Husqvarna AB, SE-433 81 Göteborg, Sweden, tel: +46-31-949000, declares under sole responsibility that the Husqvarna PG 400 SF, Husqvarna PG 280 SF dating from 2010 serial numbers and onwards (the year is clearly stated on the rating plate, followed by the serial number), complies with the requirements of the COUNCILÍS DIRECTIVE:
• of May 17, 2006 "relating to machinery" 2006/42/EC
• of December 15, 2004 "relating to electromagnetic compatibility" 2004/108/EC.
• of December 12, 2006 "relating to electrical equipment" 2006/95/EC.
The following standards have been applied: EN ISO 12100:2003, EN 55014-1:2006, EN 55015-2/A1:2001, EN 61000-3-2:2006, EN 61000-3-3/A1/A2:2005, EN 13862/A1:2009.
The supplied machine conforms to the example that underwent EC type examination.
Göteborg December 29, 2009

text_image
Handwritten signature or scribble on a white background, possibly a signature or autographHenric Andersson
Vice President, Head of Power Cutters and Construction Equipment
Husqvarna AB
(Authorized representative for Husqvarna AB and responsible for technical documentation.)
flowchart
graph TD
    A["MOTOR"] --> B["LEDA"]
    B --> C["PE"]
    C --> D["BROWN"]
    D --> E["GREEN/YELLOW"]
    E --> F["LID"]
    F --> G["PE"]
    G --> H["LEDA"]
    H --> I["PE"]
    I --> J["LEDA"]
    J --> K["PE"]
    K --> L["LEDA"]
    L --> M["PE"]
    M --> N["LEDA"]
    N --> O["PE"]
    O --> P["LEDA"]
    P --> Q["PE"]
    Q --> R["LEDA"]
    R --> S["PE"]
    S --> T["LEDA"]
    T --> U["PE"]
    U --> V["LEDA"]
    V --> W["PE"]
    W --> X["LEDA"]
    X --> Y["PE"]
    Y --> Z["LEDA"]
    Z --> AA["PE"]
    AA --> AB["LEDA"]
    AB --> AC["PE"]
    AC --> AD["LEDA"]
    AD --> AE["PE"]
    AE --> AF["LEDA"]
    AF --> AG["PE"]
    AG --> AH["LEDA"]
    AH --> AI["PE"]
    AI --> AJ["LEDA"]
    AJ --> AK["PE"]
    AK --> AL["LEDA"]
    AL --> AM["PE"]
    AM --> AN["LEDA"]
    AN --> AO["PE"]
    AO --> AP["LEDA"]
    AP --> AQ["PE"]
    AQ --> AR["LEDA"]
    AR --> AS["PE"]
    AS --> AT["LEDA"]
    AT --> AU["PE"]
    AU --> AV["LEDA"]
    AV --> AW["PE"]
    AW --> AX["LEDA"]
    AX --> AY["PE"]
    AY --> AZ["LEDA"]
    AZ --> BA["PE"]
    BA --> BB["LEDA"]
    BB --> BC["PE"]
    BC --> BD["LEDA"]
    BD --> BE["PE"]
    BE --> BF["LEDA"]
    BF --> BG["PE"]
    BG --> BH["LEDA"]
    BH --> BI["PE"]
    BI --> BJ["LEDA"]
    BJ --> BK["PE"]
    BK --> BL["LEDA"]
    BL --> BM["PE"]
    BM --> BN["LEDA"]
    BN --> BO["PE"]
    BO --> BP["LEDA"]
    BP --> BQ["PE"]
    BQ --> BR["LEDA"]
    BR --> BS["PE"]
    BS --> BT["LEDA"]
    BT --> BU["PE"]
    BU --> BV["LEDA"]
    BV --> BW["PE"]
    BW --> BX["LEDA"]
    BX --> BY["PE"]
    BY --> BZ["LEDA"]
    BZ --> CA["PE"]
    CA --> CB["LEDA"]
    CB --> CC["PE"]
    CC --> CD["LEDA"]
    CD --> CE["PE"]
    CE --> CF["LEDA"]
    CF --> CG["PE"]
    CG --> CH["LEDA"]
    CH --> CI["PE"]
    CI --> CJ["LEDA"]
    CJ --> CK["PE"]
    CK --> CL["LEDA"]
    CL --> CM["PE"]
    CM --> CN["LEDA"]
    CN --> CO["PE"]
    CO --> CP["LEDA"]
    CP --> CQ["PE"]
flowchart
graph TD
    A["MOTOR"] --> B["PE"]
    B --> C["LID"]
    C --> D["PE"]
    D --> E["CAPACITOR 50 μF"]
    E --> F["=C1"]
    E --> G["=C2"]
    H["STOP=S2"] --> I["STOP=1"]
    I --> J["BROWN"]
    J --> K["GREEN/YELLOW"]
    L["N L1 PE"] --> M["BLE BROWN GREEN/YELLOW"]
    M --> N["510434901 0.5 S TIMER"]
    N --> O["A2"]
    O --> P["CONTACTOR"]
    P --> Q["A1"]
    Q --> R["510430901 220 VAC"]
    R --> S["A2"]
    S --> T["96NC 003 6T3 017 009"]
    T --> U["95NC 019 4T2 018 012 98NO 010 2T1 97NO 012 XXX"]
    U --> V["BROWN"]
    V --> W["F2"]
    W --> X["510434101 RT1P 10-16A"]
    X --> Y["BROWN"]
    Y --> Z["96NC 003 6T3 017 009"]
    Z --> AA["95NC 019 4T2 018 012 98NO 010 2T1 97NO 012 XXX"]
    AA --> AB["BROWN"]
    AB --> AC["510434801 FAULT LAMP H1"]
    AC --> AD["RED"]
    AD --> AE["510434801"]
    AE --> AF["LED"]
    AF --> AG["START=S1"]
    AH["GREY"] --> AI["BLUE BROWN BROWN BLUE"]
    AI --> AJ["015 014 3 3 3"]
    AJ --> AK["013 016 008"]
    AL["PG 280 SF 1PH"] --> AM["STOP=S2"]
    AM --> AN["EMERGENCY STOP=S3"]
    AO["PE"] --> AP["BLUE BROWN GREEN/YELLOW"]
    AP --> AQ["GREEN/YELLOW"]
    AR["HIP"] --> AS["STOP=S2"]
    AS --> AT["BROWN"]
text_image
Technical diagram of a lawn mower with numbered components and labeled parts, including a Husqvarna device.natural_image
Line drawing of a mechanical component with a curved handle and circular base (no text or symbols)natural_image
Line drawing of a pair of trousers with a belt buckle (no text or symbols)natural_image
Technical line drawing of a mechanical component with no visible text or symbolsnatural_image
Technical line drawing of a mechanical component with arrows indicating motion or force direction (no text or symbols)natural_image
Technical line drawing of a mechanical lever mechanism (no text or symbols)natural_image
Technical line drawing of a mechanical device with wheels and a motor (no text or symbols)natural_image
Technical line drawing of a mechanical device with no visible text or symbolsnatural_image
Technical line drawing of a mechanical device with no visible text or symbolsnatural_image
Pure mechanical diagram showing a tool interacting with a component, no text or symbols presentnatural_image
Diagram of a mechanical linkage or lever mechanism with directional arrows indicating motion (no text or symbols present)natural_image
Mechanical diagram showing a lever mechanism with an upward arrow indicating motion (no text or symbols present)natural_image
Technical line drawing of a mechanical power tool with wheels and mounting bracket (no text or symbols)natural_image
Circular diagram with eight identical mechanical components arranged symmetrically around a central circle (no text or symbols)PG 280
natural_image
Circular diagram with 12 identical briefcase icons arranged in a ring around a central circle (no text or labels)PG 400
natural_image
Circular diagram with eight identical camera icons arranged radially around a central point (no text or labels)PG 280

natural_image
Circular diagram with eight small mechanical components arranged symmetrically around a central circle (no text or labels)PG 400
natural_image
Circular diagram with eight gray icons arranged radially around a central circle (no text or symbols)PG 280

natural_image
Circular diagram with eight mechanical components arranged symmetrically around a central circle (no text or labels)PG 400
natural_image
Circular diagram with six labeled components radiating from a central point (no text or symbols)PG 280

natural_image
Circular diagram with six small mechanical components arranged symmetrically around a central circle (no text or labels)PG 400
natural_image
Simple 3D diagram of a circular object with a rectangular slot on top, no text or symbols present.natural_image
Symmetrical mechanical component diagram with six circular segments and central hub (no text or symbols)PG 280

natural_image
Circular diagram with eight segmented circular components arranged symmetrically around a central circle (no text or symbols)PG 400
natural_image
Circular diagram with four segmented circular elements and radial lines, no text or symbols presentPG 280

natural_image
Circular diagram with four circular components and a central circle, no text or symbols presentPG 400
natural_image
Illustration of a hand holding a mechanical component with a circular housing and a tool, no text or symbols present.Antes de arrancar

text_image
Diagram of an electrical switch mechanism with labeled components and rotation arrownatural_image
Technical line drawing of a mechanical tool with directional arrows indicating movement (no text or symbols)natural_image
Pure mechanical component diagram without any text, numbers, or symbolsParada

natural_image
Pure mechanical component diagram without any text, numbers, or symbolsflowchart
graph TD
    A["MOTOR"] --> B["PE"]
    B --> C["LID"]
    C --> D["PE"]
    D --> E["CAPACITOR 50 μF"]
    E --> F["CAPACITOR 50 μF"]
    F --> G["LED 510434801 FAULT LAMP =H1₁ RED"]
    G --> H["BLUE BROWN"]
    G --> I["BLE BROWN"]
    G --> J["BLE BROWN"]
    G --> K["BLE BROWN"]
    G --> L["BLE BROWN"]
    G --> M["BLE BROWN"]
    G --> N["BLE BROWN"]
    G --> O["BLE BROWN"]
    G --> P["BLE BROWN"]
    G --> Q["BLE BROWN"]
    G --> R["BLE BROWN"]
    G --> S["BLE BROWN"]
    G --> T["BLE BROWN"]
    G --> U["BLE BROWN"]
    G --> V["BLE BROWN"]
    G --> W["BLE BROWN"]
    G --> X["BLE BROWN"]
    G --> Y["BLE BROWN"]
    G --> Z["BLE BROWN"]
    G --> AA["BLE BROWN"]
    G --> AB["BLE BROWN"]
    G --> AC["BLE BROWN"]
    G --> AD["BLE BROWN"]
    G --> AE["BLE BROWN"]
    G --> AF["BLE BROWN"]
    G --> AG["BLE BROWN"]
    G --> AH["BLE BROWN"]
    G --> AI["BLE BROWN"]
    G --> AJ["BLE BROWN"]
    G --> AK["BLE BROWN"]
    G --> AL["BLE BROWN"]
    G --> AM["BLE BROWN"]
    G --> AN["BLE BROWN"]
    G --> AO["BLE BROWN"]
    G --> AP["BLE BROWN"]
    G --> AQ["BLE BROWN"]
    G --> AR["BLE BROWN"]
    G --> AS["BLE BROWN"]
    G --> AT["BLE BROWN"]
    G --> AU["BLE BROWN"]
    G --> AV["BLE BROWN"]
    G --> AW["BLE BROWN"]
    G --> AX["BLE BROWN"]
    G --> AY["BLE BROWN"]
    G --> AZ["BLE BROWN"]
    G --> BA["BLE BROWN"]
    G --> BB["BLE BROWN"]
    G --> BC["BLE BROWN"]
    G --> BD["BLE BROWN"]
    G --> BE["BLE BROWN"]
    G --> BF["BLE BROWN"]
    G --> BG["BLE BROWN"]
    G --> BH["BLE BROWN"]
    G --> BI["BLE BROWN"]
    G --> BJ["BLE BROWN"]
    G --> BK["BLE BROWN"]
    G --> BL["BLE BROWN"]
    G --> BM["BLE BROWN"]
    G --> BN["BLE BROWN"]
    G --> BO["BLE BROWN"]
    G --> BP["BLE BROWN"]
    G --> BQ["BLE BROWN"]
    G --> BR["BLE BROWN"]
    G --> BS["BLE BROWN"]
    G --> BT["BLE BROWN"]
    G --> BU["BLE BROWN"]
    G --> BV["BLE BROWN"]
    G --> BW["BLE BROWN"]
    G --> BX["BLE BROWN"]
    G --> BY["BLE BROWN"]
    G --> BZ["BLE BROWN"]
    G --> CA["BLE BROWN"]
    G --> CB["BLE BROWN"]
    G --> CC["BLE BROWN"]
    G --> CD["BLE BROWN"]
    G --> CE["BLE BROWN"]
    G --> CF["BLE BROWN"]
    G --> CGB["BLE BROWN"]
    G --> CHB["BLE BROWN"]
    G --> CIB["BLE BROWN"]
    G --> CJB["BLE BROWN"]
    G --> CKB["BLE BROWN"]
    G --> CLB["BLE BROWN"]
    G --> CDG.BL
    C --> CDG.BL
    C --> CEG.BL
    C --> CFG.BL
    C --> CGG.BL
    C --> CEG.BL
    C --> CEG.BL
    C --> CEG.BL
    C --> CEG.BL
    C --> CEG.BL
    C --> CEG.BL
    C --> CEG.BL
    C --> CEG.BL
    C --> CEG.BL
    C --> CEG.BL
    C --> CEG.BL
    C --> CEG.BL
    C --> CEG.BL
Symbole am Gerät:
text_image
Technical diagram of a cleaning machine with numbered components and labeled parts, including a Husqvana logo.natural_image
Line drawing of a mechanical component with no visible text or symbolsnatural_image
Line drawing of a pair of trousers with a belt buckle (no text or symbols)natural_image
Technical line drawing of a mechanical clamp or bracket assembly (no text or symbols)natural_image
Technical line drawing of a mechanical component with arrows indicating motion or assembly (no text or symbols)natural_image
Technical line drawing of a mechanical lever mechanism (no text or symbols)natural_image
Technical line drawing of a mechanical device with wheels and components (no text or symbols)natural_image
Technical line drawing of a mechanical device with no visible text or symbolsnatural_image
Technical line drawing of a mechanical device with gears and a central fan (no text or symbols)natural_image
Technical line drawing of a mechanical assembly with a tool and component (no text or symbols)natural_image
Diagram of a mechanical device with directional arrows indicating motion or force (no text or symbols)natural_image
Mechanical lever mechanism diagram showing pivot point and guide mechanism (no text or labels)natural_image
Technical line drawing of a mechanical lawn mower assembly (no text or symbols)natural_image
Circular diagram with 12 identical mechanical components arranged in a symmetrical pattern (no text or symbols)PG 280
natural_image
Circular diagram with 12 identical mechanical components arranged in a ring around a central circle (no text or symbols)PG 400
natural_image
Circular diagram with eight identical gray briefcase icons arranged radially around a central point (no text or labels)PG 280
natural_image
Circular diagram with eight small mechanical components arranged symmetrically around a central circle (no text or labels)PG 400
natural_image
Circular diagram with eight labeled mechanical components arranged around a central hub (no text or symbols)PG 280
natural_image
Circular diagram with eight small mechanical components arranged symmetrically around a central circle (no text or labels)PG 400
natural_image
Circular diagram with six connected components, no text or symbols presentPG 280
natural_image
Circular diagram with six small mechanical components arranged symmetrically around a central circle (no text or symbols)PG 400
natural_image
Simple 3D diagram of a circular object with a rectangular slot on top, no text or symbols present.natural_image
Symmetrical mechanical component diagram with six circular segments and central hub (no text or symbols)PG 280

natural_image
Circular diagram with eight segmented circular components arranged symmetrically around a central circle (no text or symbols)PG 400
natural_image
Circular diagram with four radial segments and circular elements, no text or symbols presentPG 280

natural_image
Circular diagram with four circular components and a central circle, no text or symbols presentPG 400
natural_image
Illustration of a hand holding a mechanical component with a circular base and a tool, no text or symbols presentVor dem Start

text_image
Diagram of a mechanical device with labeled components and directional arrow, showing rotational motion symbolnatural_image
Diagram of a mechanical tool with directional arrows indicating movement or force (no text or symbols present)natural_image
Pure mechanical component diagram without any text, numbers, or symbolsStoppen

natural_image
Pure mechanical component diagram without any text, numbers, or symbolstext_image
Handwritten signature or scribble on a white background, possibly a signature or autographHenric Andersson
Vice President, Head of Power Cutters and Construction Equipment
Husqvarna AB
text_image
Technical diagram of a lawn mower with numbered components and labeled parts, including a Husqvarna device.Composants de la meule
natural_image
Line drawing of a mechanical component with a curved handle and circular end (no text or symbols)natural_image
Line drawing of a pair of trousers with a belt buckle (no text or symbols)natural_image
Technical line drawing of a mechanical clamp or bracket assembly (no text or symbols)natural_image
Technical line drawing of a mechanical component with arrows indicating motion or assembly (no text or symbols)natural_image
Technical line drawing of a mechanical lever mechanism (no text or symbols)natural_image
Technical line drawing of a mechanical pump or sprinkler assembly (no text or symbols)natural_image
Technical line drawing of a mechanical device with gears and a central hub (no text or symbols)natural_image
Technical line drawing of a mechanical device with gears and a central dial (no text or symbols)natural_image
Pure mechanical diagram showing a lever and base assembly without any text, numbers, or symbolsnatural_image
Diagram of a mechanical device with directional arrows indicating motion or force (no text or symbols)natural_image
Diagram of a mechanical device with lever and guide mechanism (no text or symbols)natural_image
Technical line drawing of a mechanical power tool with wheels and mounting bracket (no text or symbols)natural_image
Circular diagram with 12 identical mechanical components arranged in a symmetrical pattern (no text or symbols)PG 280
natural_image
Circular diagram with 12 identical mechanical components arranged in a ring around a central circle (no text or symbols)PG 400
natural_image
Circular diagram with eight identical briefcases arranged symmetrically around a central point (no text or symbols)PG 280
natural_image
Circular diagram with eight small mechanical components arranged symmetrically around a central circle (no text or labels)PG 400
natural_image
Circular diagram with eight gray mechanical components arranged around a central hub, no text or symbols present.PG 280

natural_image
Circular diagram with eight mechanical components arranged symmetrically around a central circle (no text or labels)PG 400
natural_image
Circular diagram with six labeled components arranged radially around a central point (no text or symbols)PG 280

natural_image
Circular diagram with six mechanical components arranged symmetrically around a central circle (no text or labels)PG 400
natural_image
Simple 3D diagram of a circular object with a rectangular slot on top, no text or symbols present.natural_image
Symmetrical mechanical component diagram with six circular segments and central hub (no text or symbols)PG 280
natural_image
Circular diagram with eight segmented circular components arranged symmetrically around a central circle (no text or symbols)PG 400
natural_image
Circular diagram with four radial segments and circular elements, no text or symbols presentPG 280
natural_image
Circular diagram with four circular components and a central circle, no text or symbols presentPG 400
natural_image
Illustration of a hand using a tool to adjust or install a mechanical component, with no visible text or symbols.natural_image
Diagram of a mechanical tool with directional arrows indicating movement or force (no text or symbols present)natural_image
Pure mechanical component diagram without any text, numbers, or symbolsArrêt
